Jeepskate's Joint
About Me
Links
Trail Run Pics
Tech Articles
Jeepskate:
Suspension
Steering
Drivetrain
Body/Interior
Jeepskate
II/XL:
Suspension
Steering
Drivetrain
Body/Interior
1 Last
7:
Suspension
Steering
Drivetrain
Body/Interior
![]()
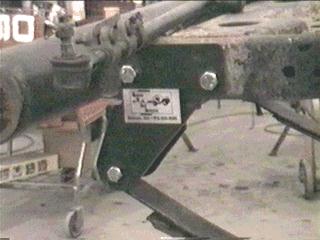
Frame Preparation
As was said before, Jeepskate started as someone else's project and was purchased as a rolling frame for $400. I immediately tore it the rest of the way down, kept what I felt was usable, and tossed the rest. I used a cut-off tool and air chisel to remove the rear crossmember. Note that the stock rear shackle hangers were also removed. These were replaced with heavy duty units from Slickrock Enterprises that were custom machined by M.O.R.E to accept larger greaseable Wrangler shackle bushings. Pat at ChicagoLand 4WD (now out of business unfortunately...it was nice having a shop a few blocks from home) welded on a heavy duty replacement crossmember that I purchased from 4WD Hardware. The skid plate was replaced with one from an '81 CJ since I'm using a Dana 300 instead of the Dana 20 that the Jeep came with. I unbolted the power steering box brackets and front shackle hangers and drilled out a broken bolt. Then I used a cut-off wheel and air chisel to remove the heads from the rivets that hold the front spring mounts on, and basically just beat on them with a baby sledge until they flew off the frame. Clean up of the old welds was done with an angle grinder. This was all done in preparation for the installation of a front shackle reversal from M.O.R.E. This particular kit is setup for installing Wrangler springs on a CJ. The big tube front bumper was removed with a torch for aesthetics. The two body mounts in front of the rear tires were relocated to facilitate the use of a YJ body tub while retaining usage of all of the stock body mounts. Note that standard CJ nerf bars will not fit with this setup. Additionally, a MORE dual shock hoop kit was welded on up front. When I got Jeepskate back from the shop, it was essentially a rolling chassis which I then had to strip back down. Once it was back down to the bare frame, I went over it with an angle grinder and a wire wheel to remove dirt, surface rust, and loose paint. Then I cleaned it up with POR-15 Marine Clean and prepped it with Metal Ready. And finally, I coated it with two coats of grey POR-15 and top-coated it with two coats of POR-15 Chassiscoat Black top coat. I used the grey POR-15 since it has better fill properties than the other versions to help hide some of the pitting and other imperfections.
Front Shackle Reversal
By installing a front shackle reversal kit, you are simply changing the position of the front spring shackle from the front of the spring to the rear of the spring. This duplicates the same, more natural setup that the rear has from the factory. With the front shackle reversal installed, the front axle now has the ability to swing in the same rearward arc as the rear axle when traveling over rough terrain, railroad crossings, potholes etc. This all but eliminates bump steer and the vehicle is easier to control and rides more comfortably. On the flip-side, you may experience more nose dive under hard-braking conditions. I purchased my kit from M.O.R.E. Kits are also manufactured by Warrior Products, National Spring, FST/Fly-N-Hi, Rocky Road Outfitters, and a few others. I think the Trailmaster and Rough Country kits are re-packaged FST kits. I selected the M.O.R.E kit for a few reasons: I had read good things about it in several magazines, it looked beefy, they seemed to have done their homework on the various pitfalls with different brands of springs and fully bolt-on kits, and it is the only kit that doesn't provide additional lift (which would need to be compensated for in the rear). Also, they were the only ones at that time who offered the kit with greaseable bushings and customized for mounting YJ springs on a CJ. This particular kit is considered a "weld-on" since the new shackle mounting eye doesn't bolt to the bottom of the frame rail. First, the front shackle hangers must be unbolted from the frame. I also recommend a quick pass with a grinder to clean up any "boogers." Then I used a cut-off tool and air chisel to remove the heads from the rivets that secure the spring hangers to the frame, and beat the hell out of the hangers with a baby sledge until they broke free of the frame. The stubs of the rivets were simply hammered flush with the frame and a pass was made with the grinder. The new stationary front mounting brackets get bolted to the front frame rails, and the springs are installed. Note that the springs must be spun around so that the end that was in the original stationary bracket at the rear now ends up in the new stationary bracket at the front. Also note that sleeves are provided in the kit so that you don't crush your frame while tightening the bolts and nylocks. After locating the springs and shackles properly and some careful measuring, the frame is drilled and a sleeve is welded in the opening to form the eye that the upper shackle bolt passes through. Be aware that with this setup, you may experience contact between your tires and the rear of the fender opening (M.O.R.E alleviates this to some extent by relocating the axle further forward) and you may need to have your driveshaft modified to handle more compression since it was originally intended to have more travel on extension.
Spring-Over Axle Conversion & Front Dual-Shock Hoops
Essentially, after a bad experience with an Explorer Pro-Comp suspension lift on Alter Ego (their motto should be "Like a Rock"), I was looking for something "special". I believe that I may have found that in a spring-over-axle (SOA) conversion with Wrangler springs. This nets a 5" or better lift (depends upon spring pack thickness, spring pad height, and axle tube diameter) while maintaining the soft ride of stock springs, and giving the fantastic articulation that flat leaf spring packs are known for. Probably the biggest issue with SOA's is rear axle-wrap. Axle or spring wrap is common in all leaf sprung vehicles, but is more noticeable on SOA vehicles and is aggravated by a heavy foot and/or powerful engine. This is typically addressed with various items like longer spring perches, longer u-bolt plates, and anti-wrap arms. I got a pair of '95 front springs in the big parts deal that netted all of my other '95 YJ parts, and a complete set of springs from a '93 when a guy at work traded his lifted Wrangler in. The '95's are on the front, and the rear pair of '93's is on the rear. A Mountain Off Road Enterprises (M.O.R.E) front dual shock hoop kit was installed up front, and I am running Trailmaster SSV shocks. All bushings are polyurethane and the shackle and spring bolts have grease fittings (zerk). Be aware that the shackle reversal can actually be detrimental on a setup like this if your spring packs are flat since compression of the springs would cause the shackles to pivot forward rather than rearward. It is also generally accepted now that stock YJ springs are too soft for this application and will sag fairly quickly under heavy use. JKS/Slickrock Enterprises heavy duty rear shackle hangers (bored to accept larger greaseable YJ bushings by M.O.R.E) and M.O.R.E greaseable rear shackles were mounted out back. This conversion also involves items like: modified steering linkage, longer brake hoses, CV-joint rear driveshaft, and a lengthened front driveshaft. A lot of people think that this can be done very simply and cheaply, but this is only true if you can do all of the work yourself or cut corners.
After the demise of ChicagoLand 4WD Center, I noticed that my earlier uneasiness about their placement of my SRS' upper sleeves was warranted. The sleeves were placed too far toward the rear so that even when the front springs settled to nearly flat, the shackles were angled a bit toward the front. I came across someone selling the springs from a Grand Wagoneer and asked for an eye-to-eye measurement of them. The front springs are the same 2.5" width and turned out to be about 2" longer with the center pin located the same distance from the fixed end as the YJ springs, so I grabbed them up. These should work nicely the fix the geometry of the front shackles, and the 7-leaf packs should stand up pretty well to the flex of the SOA which tends to eat up stock YJ spring packs.
Since I'll be running 35's with soft YJ springs, I wanted to have some extra dampening and control. I previously used a dual front setup by Desert Steel on Alter Ego that was basically a replacement u-bolt plate and a bracket that bolted onto the factory upper mounting bracket. This time I wanted something that was impressive and stronger, so I again turned to M.O.R.E. This kit is sorta like handing a box of Lego™ blocks to a kid...there's enough stuff in this kit to probably make 4 hoops!! You're basically given enough material to rig up this setup on any type of truck. The lower mounts are pretty straightforward: You get 4 drilled and fish-mouthed plates that get welded to the axle tubes, and bolts to mount the shocks. The top is where things get interesting. The hoops are probably big enough to run uncut full-size truck axles with the top of the hoop touching the underside of the fenders. Mine have been significantly cut-down and re-welded. I had them welded to the frame, but the kit has provisions to make them bolt-ons if you choose. The shock mounting tabs are welded where they work out best, and tubing is provided to brace the hoops against the frame. I decided not to use this bracing, and will brace the tubes to each other with a connecting bar that passes through the engine compartment over top of the engine if I find that I need to brace them. In the rear, the stock upper mounts were revitalized with new studs. The stock GM lower mounts that were removed from the front axle housing were salvaged and re-used in the rear to allow the use of longer travel shocks. I may change the mounting of the rear shocks to something like Craig Myer's Wrangler canti-levered setup to improve sway control and help control body roll. I'm using Trailmaster SSV's which are speed sensitive shocks that adjust the valving themselves rather than adjusting a knob like you must do with Rancho RS9000's which were my top choice until Pat turned me on to these. The Trailmasters are sort of a pre-cursor to the Edelbrock IAS shocks, but cost about half the price. I'd like to see a head-to-head seat-of-the-pants comparison of them.

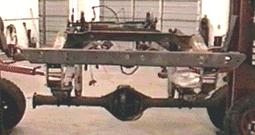
Let The Games Begin...
The frame after removal of rear x-member
and front spring hangers.
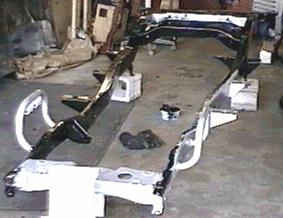
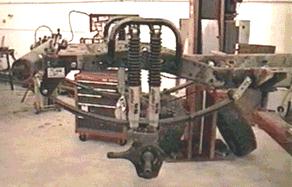
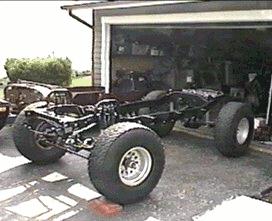
Coming Together...
In the shop with the new crossmember welded
on and suspension in place.
Back Down Again...
Stripped to the frame again with 2 coats of
grey POR-15 & start of the first coat of chassis black topcoat.
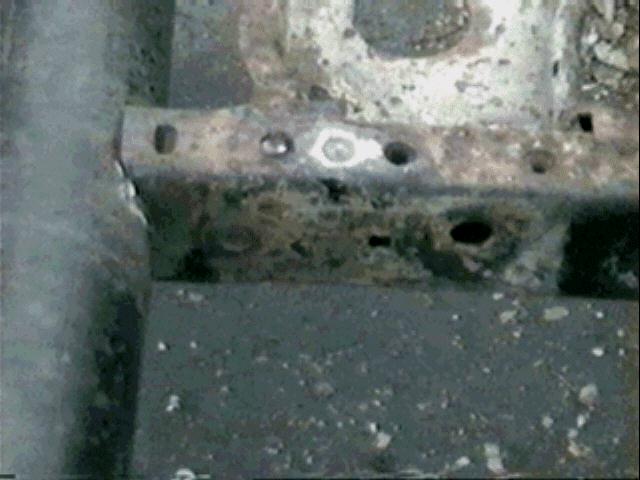
Out With The Old...
The frame after removing the front shackle
& spring hangers.
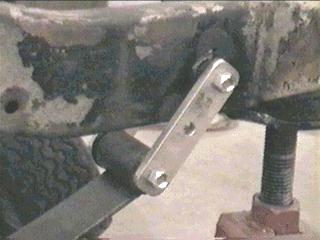
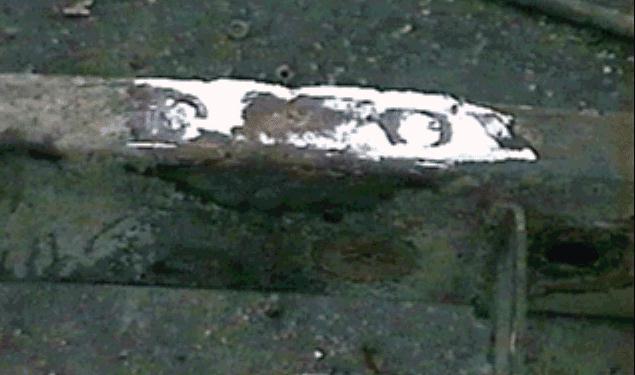
In With The New...
The new bracketry bolted and welded into
place.
Up Front...
I "cheated" and used a GM front
axle which is already setup SOA.
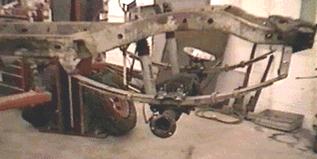
In The Rear...
The original Scout spring pads were cut off and
welded back on to match.
Rollin, Rollin, Rollin...
Sitting on BFG 35x12 AT's and 15x10
American Eagle wheels.